Punto makes it easy to create wonderful embroideries directly on your computer. With powerful graphics tools you can follow your idea from the sketch to the finished design, all on your personal computer. It's the ideal design/production tool for punchers, embroiderers, screenprinters and personalized items companies and shops.
With Punto software you can start from a sketch, scan it and then change it at will. You can create new artworks on your personal computer and then mix them with existing drawings and text. Trying all the different combinations of shapes, embroidery effects and colors has never been so easy. You can use drawings created with many graphic applications (Adobe Illustrator, Corel CorelDRAW!, Macromedia FreeHand, and others), apply the embroidery effects and Punto will calculate the stitches for you.
You can automatically convert a scanned image, create text with fancy perspectives, use thousands of fonts and clip arts. Unlike other systems, you don't have to digitize your work again, just apply the embroidery effects to automatically calculate the stitches. Punto has a wide range of tools. Different kinds of pens and geometric tools can be used to draw freehand shapes, rectangles, circles, polygons, stars, spirals and other designs.
You can apply many different kinds of embroidery effects to your drawings. Each effect can be customized giving you an unlimited range of choices. Running, satin, fill, random stitches, backgrounds, tiles, curved fill, sequins, variable density, multicolor motifs, bean stitches and pull compensation are just some of the effects that Punto can create for you. You can change any effect at any time. You can duplicate, change and mix together different designs. Drawings and embroideries can be easily enlarged, rotated or slanted. Punto will automatically recalculate the new stitches producing the same level of quality.
You can easily create monograms with Punto fonts or you can apply your embroidery effects to thousands of already made fonts and create your embroideries without drawing a single line.
You can read embroideries from other systems and write them on disks, paper tapes or send them directly to your embroidery machine. Punto supports all the most common embroidery standards.
Punto capabilities allow full control of the designing process, merging powerful and intuitive vector graphics tools with professional and productive embroidery features.
Punto is the only true cross-platform software of the embroidery industry, available for Windows and Mac OS X.
Punto is a modular software that enables you to choose the level that exactly matches your needs. This also means that as your business grows, also Punto performance can increase alongside keeping you on the edge, simply upgrading to next level. What are common between all levels are the user interface and the application itself, features will be available or work differently depending on the level you have chosen. No cost in terms of learning curve, upgrading to an higher level requires only to learn the new features available not the whole software, and investment safe, no extra-cost than the difference in price between the level you have and the upgrade you require. For more details see Specifications.
Punto Lettering
It's our entry level application, it's a complete lettering solution that allows you to import existing embroidery, that you may buy from punching companies or that you have already produced with other punching software, add text choosing from the typefaces included, and export to your embroidery machine.
Punto Manager
It's a complete editing solution, including all Lettering features, that allows you to modify existing embroidery that you may buy from punching companies or that you have already produced with other punching software. The Modify, Transform and Guess Recalc commands, allow you to operate globally on your design and change the parameters such as density, length, height, phase and number of stitches, or even to transform fills into satins and vice versa. Other than modify existing designs on all the major professional expanded embroidery formats, it allows you to edit the Punto's high-quality scalable condensed native format.
Punto Lite
This is our entry level punching software, a punching solution that takes the enormous advantage of being a vector based embroidery software. Recognized worldwide as the punching software with the easiest user interface. All more important embroidery effects parameters can be set so you can apply basic embroidery effects in few minutes, in this case Punto Lite will automatically fit for you the best combination of minor parameters for each effect.
Punto Easy
Basic level punching software, recognized worldwide as the vector based embroidery software with the easiest user interface, combines easy to use graphic tools with powerful stitching processor. It's a editing and digitizing solution.
Punto Expert
This level includes all of Punto Easy features as well as advanced features such as motifs, backgrounds, tiles, automatic advanced underlays, segmentation, overlaps, designs browser, smart direction/border lines, effects libraries, smart special functions, and so on. This is our professional level punching software, a full punching solution that takes the enormous advantage of being a vector based embroidery software.
Punto Designer
Punto Designer is the top of the line of our embroidery software. It matches all Punto Expert capabilities plus sequin tools, likelife 3D rendering and catalogue features. It allows you to prepare a database of your embroideries and to create likelife images with fabric background that can be printed on any color printer. It also allows you to create lifelike images of embroideries with applique; turning on the applique parameter in the running effect setup you will be asked to select the type of applique you want to combine with the embroidery, that can be chosen in the applique menu or can be acquired with a standard color scanner.
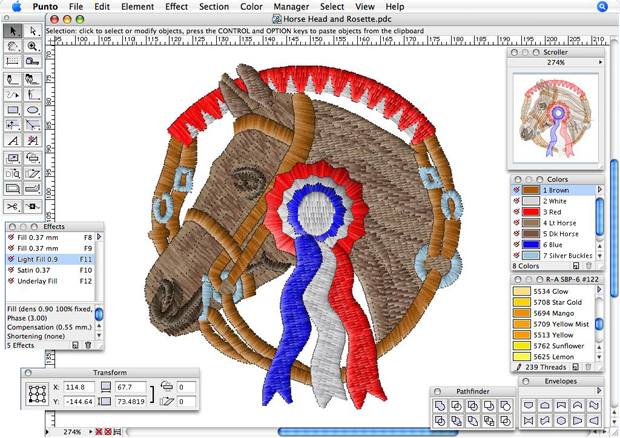
The Selection tool lets you select entire elements by clicking on them or by dragging a rectangle over them. The Direct Selection tool lets you select individual anchor points, path segments, or entire elements by clicking on them or by dragging a rectangle over them. The Lasso Selection tool lets you select entire elements by dragging an irregular shape around all or part of the elements. The Direct Lasso Selection tool lets you select elements, anchor points, or path segments by dragging an irregular shape around all or part of the elements.

When you select one or more elements with the Selection or the Lasso Selection tool, a bounding box displays around them. The bounding box lets you scale, rotate, reflect, and shear elements easily by dragging a handle.
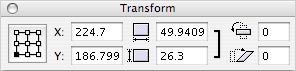
The new Transform palette displays information about the location and size of current selection. By typing new values, you can move, scale, rotate, reflect and shear the selected elements, change the transformation origin point and keep the elements' proportions.
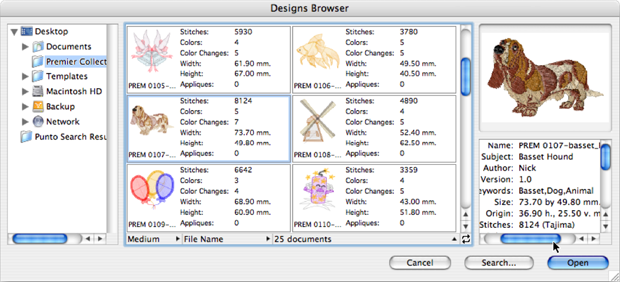
The new Design Browser window makes it easy to view, search, select, and open multiple designs. The Design Browser window shows multiple designs thumbnails together with important information such as size, number of colors and stitches, and more. You can display a three-dimensional, photorealistic preview and comprehensive design information. You can search for designs by keywords, size, number of stitches, and other criteria.
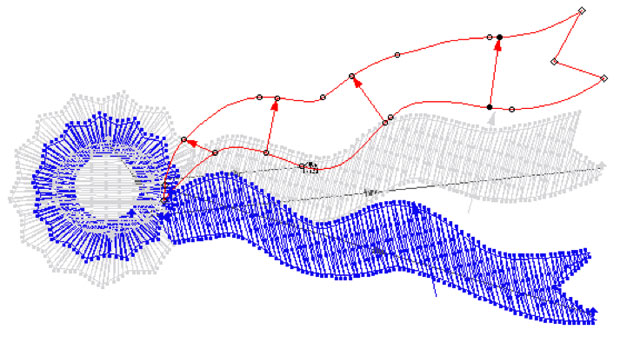
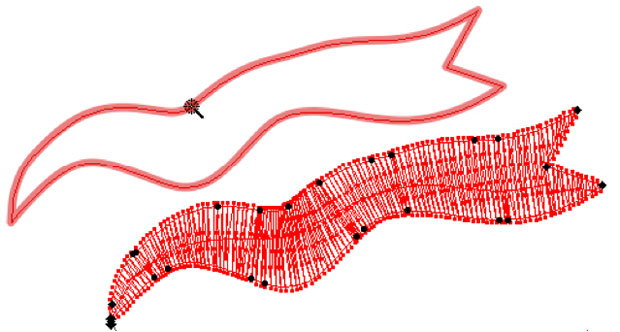
These new tools let you draw a direction or border line and hook it to a path or section simultaneously. Moreover, these tools provide visual feedbacks that help you to create, place, and align direction and border lines over paths and sections. This will speed up the digitizing process.
You can either place sequins manually by using the Sequin tool or allow the application to automatically place sequins for you along a path by using the Sequin effect. You can automatically apply different tacking stitches in order to hold the sequin on the fabric that you can choose among built-in tacking stitches or your own tacking stitches created from scratch to match your needs. The Sequin effect allows you to set the sequins spacing, the tacking stitches style, the size of the tacking stitches, force the feeding direction, and so on. You can specify the settings (sequin shape, size, color and name) of the sequin device installed on a particular color/needle using the Colors palette. The new Needles & Sequins section of the worksheet reports the number of sequins used in the design. Sequin capability is currently only supported in Tajima and ZSK embroidery machine format.
In Punto you can use the new Borer On and Borer Off special functions to activate and deactivate the boring capability. With the boring capability activated, any needle penetration is a stab. The Machine pane of the Information dialog box includes info on how to interpret boring commands. Boring is currently only supported in Tajima, ZSK, and Barudan machine formats.
The Quick Punch tool quickly digitizes paths applying the embroidery effect currently selected in the Effects palette. As you click, the path is "cut" using border lines, sewing order is detected, direction lines are added to define stitches angle, and the embroidery effect selected in the Effects palette is applied. This tool speeds up the digitizing process of simple shapes.
The Convert Font command lets you convert any OpenType, TrueType or PostScript Type 1 font installed on your system to an embroidery font.
Punto 7 introduces a new, powerful font format. The new format is also cross-platform so you can move font documents back and forth between the Mac OS and Windows platforms by just moving documents back and forth physically. Punto 7 supports both the new format and the old one (starting with Punto 4).
Smart Highlighting is a special feature that help you to select and edit elements. When Smart Highlighting is turned on and you move the cursor over your design, the cursor looks for elements to highlight the element below the pointer and to show information (type, effect, color, number of stitches,...) about it in a new panel of the Information palette. The appearance of Smart Highlighting is determined by settings in the Smart Highlighting panel of the new Preferences dialog box.
The new Machine pane in the Information dialog box allows you to select the embroidery machine settings: the format of the control commands understood by the embroidery machine, how to interpret color changes and trims, the maximum frame movement, an so on. This allows to accurately display in the worksheet, Information dialog box, etc., the total number of stitches for each design according to its machine settings.
The new Smart Special Functions lets you select a special function in the document window and move it. Moreover, while you drag the special function, visual feedbacks help you to automatically place the special function at the end point of the desired section.

The new Attributes palette displays the attributes (effect, color, special functions, lock stitches) associated with selected element. Moreover, you can change the attributes of the selected element by using the controls of the Attributes palette.
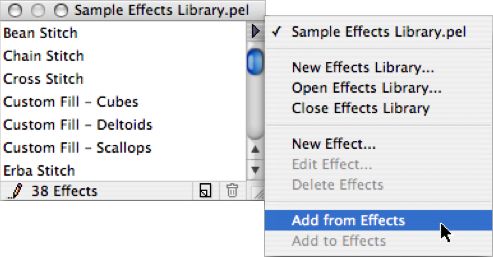
The new Effects Libraries palette lets you create collections of your own embroidery effects, e.g., for a specific thread and fabric. Once you save a collection of embroidery effects as an Effects Library, you can use them repeatedly in your designs.
The Reorder by Sequence command in the Colors palette's pop-up menu allows to reorder the Colors palette's items to match the sequence of colors used in the design's execution: the first color displayed in the Colors palette, i.e., the first needle on the embroidery machine, is the first one used in the design, and so on. You can move a color in the Color palette by dragging it in the desired position, in this way you can easily assign a color to a specific needle. This is useful to match a particular needles/colors setups on embroidery machines.
Now you can have different thread types in the same design. In the Colors and Threads palettes you can select the appropriate thread type. The thread types set in the colors used in the design are shown in the worksheet.
Each thread contains the thread line and it is possible to selectively import threads from tab-delimited text files and existing Punto threads libraries: this allows to easily create own threads color charts form different sources and manufacturers. The Find command has been re-written with more options. A palette options command allows to set how the Threads palette works.
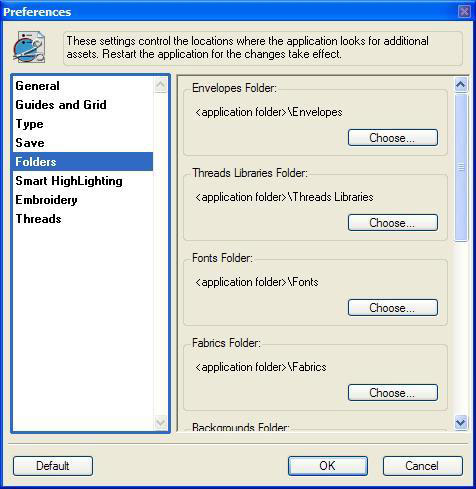
The new Preferences dialog box has been organized in multiple panes and it lets you specify more options regarding how you want Punto to work, including those for tools, guides, units, and display.
Punto allows you to periodically save open documents. You can also specify the time period between saves.
Quick Look is a technology introduced in Mac OS X version 10.5 that enables client applications, such as Open dialogs and Finder, to display thumbnail images and full-size previews of documents. Previous custom preview support is no longer available in Mac OS X version 10.5. Punto includes a Quick Look plug-in that converts a Punto document from its native format into a format that Quick Look can display to users.
Automatic centerline, Edge, Zig Zag, and Fill underlays have been added in the Lite and Easy levels.
The automatic fixed pull compensation for fill and satin stitches has been added in the Lite and Easy levels.
Some of the Punto features:
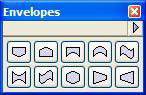
The Envelopes palette enables you to create what are commonly called "envelope distortions". These are alterations to the shape of your artwork, achieved by attaching Bézier anchor points and direction handles to a rectangle (envelope) around your selected artwork and manipulating them to create the desired effect. Envelopes are particularly fun when used with typefaces and logos.
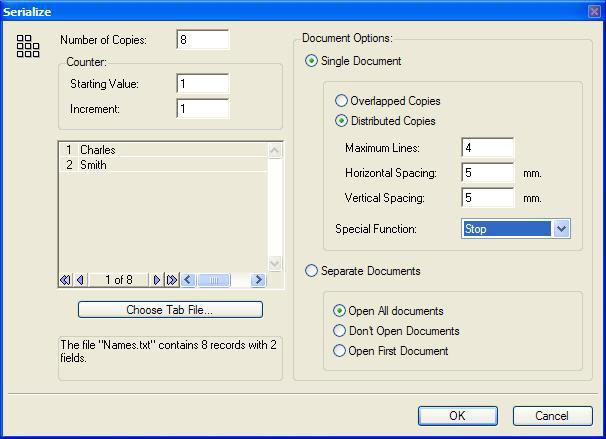
The Serialize command makes easy to create personalized items or any other serialized graphics. Combine text layouts, graphics, and external text file, add the Serialize ability to generate a series of numbers and suddenly what used to take an entire day happens in seconds. It is useful to produce large run generic designs that contains slight text variations.
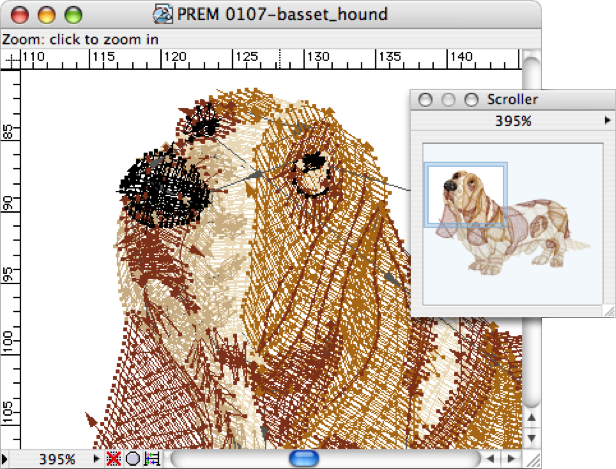
The Scroller palette helps you to quickly view different areas of an artwork, locate the area you are viewing within the artwork, and change the magnification of the artwork. When you are working on complex artwork documents, you often want to move on key areas without having to scroll or wait for the screen to redraw several times. The Scroller palette makes it a breeze for you to instantly move on any area of your artwork and see your edits in a larger context. With the Scroller palette, you can even specify a precise zoom of up to 10000 percent.

The Pathfinder palette allows to create elements instantly that would otherwise be challenging to create. Ten pathfinder commands create new elements by combining, subdividing, or isolating parts of overlapping elements. The available commands are: Unite, Intersect, Exclude, Minus Front, Minus Back, Divide, Trim, Merge, Crop, and Outline.
The Knife tool in the Tools palette and the Slice command in the Element menu cut elements in pieces. The Slice command allows you to use the selected path as a die-cut or stencil to cut through other overlapping elements, slicing them into discrete pieces according to the boundaries of the selected path. The Knife tool slices elements using a freehand path you draw with the tool. When you drag the Knife tool, it draws a cutting path that divides overlapping elements into separate pieces.

Production worksheet includes any essential information is necessary to the machine operator: the picture of the design, the general design information, the needles/colors used in the design, the color sequence, and so on. The Page Content dialog box contains the print options, the editable color sequence, and the worksheet preview (large worksheet may be displayed over a number of pages).
The USB version of Aladdin dongles is a true cross platform solution supporting the Windows and Mac OS X operating systems. This means that a single USB dongle and Punto CD allow you to run your Punto for Windows on PCs, and your Punto for Mac OS X on Apple computers. With Punto, you can work seamlessly in multi-platform environments.
Steil produces closely arranged zigzag stitches of consistent width around a single path. It can be applied to any path, open or closed. Steil if often used to form borders. The parameters in the Effect dialog box allow you to check any attribute of the steil. In Easy Mode you can set the steil width, density, compensation, kind, and shortening. In Expert Mode you can set the steil width, on which side of the path place the stitches (Left, Right, or justify), the corner fraction (the corner fraction determines how many stitches will turn on corner), density, density position, running length, minimum length, kind, compensation, and shortening.
Combined Fill is a decorative type of stitch. It is another way to fill wide and large areas with unique artistic effects while keeping the appearance of a solid field of stitching. When you apply a fill effect, the Combined Fill feature automatically changes fill to satin and back to fill on any open path included in the most external path, i.e., the needle penetrations inside the open paths are removed.
Curved Fill is a decorative type of stitch similar to the Fill effect but the stitch lines follow the contours of the shape creating “curved” stitch lines that flow evenly and gradually throughout the shape edges. You can create unique and decorative effects ideal for leaves, sails, water, grass, clouds, hair, and others.
For Satin, Fill and Steil effects you can select a fixed density, automatically adjusted density (Satin only), or variable density. When you use variable density, the density gradually changes between the max and min density values according to the selected effect (up to eight) producing effects similar to halftones. Variable density allows you to automatically create many different shading, perspective and color blending effects.
For Satin, Fill and Steil effects you can select an overlap value. It defines the overlap that will be added at the joining points of adjoining shapes of sections, to avoid gaps due to fabric elasticity. During stitching the fabric is moved and stretched so two parts of filling stitches could not quite meet or “join-up” together properly showing unwanted gaps between the two adjoining shapes. To overcome these unwanted gaps, the Overlap value lightly overlaps, adding extra stitch lines, the shapes where they join.
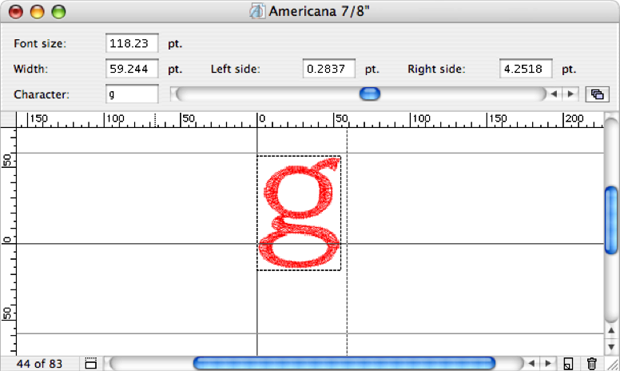
This format and related windows and tools make easier to create and modify embroidery fonts. In Punto you can create your own fonts from scratch or using the system fonts available as a bottom line for the creation of new fonts. Punto gives you sophisticated tools for modify existing fonts and design new ones. It gives you control over the outlines, embroidery effects, spacing and kerning between characters. Moreover, this format supports two-byte scripts allowing you to create Japanese, Chinese and Korean fonts.
The Monogram tool allows you to create true text objects using embroidery fonts. The Monogram dialog box gives you control over size, leading, spacing, width scale, slanting, alignment, connection method and trim conditions. Text objects created with the Monogram tool can be modified and handled just like other elements: you can scale, skew, reflect, rotate, move, duplicate and clone text objects as well as convert them into sections. The tool supports 2-byte scripts.
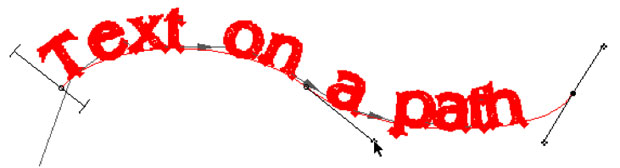
You can join text created with the new Monogram tool to freeform paths or basic shapes using the “Join to Path” command on the Element menu. Text can appear along curves, around circles, or along vertical or diagonal lines.
These embroidery typefaces were created in Punto using very specific and versatile procedures, resulting in high quality, adaptable monogram letters. Most of the typefaces will have both a full-chest size (7/8 inch) and left-chest size (5/16 inch). The typefaces have been optimized to run at these size, but can also be scaled to other sizes. This results in a much higher quality typeface with better sewing capabilities.
Take advantage of multiple levels of undo/redo for correcting mistakes and changing your mind.
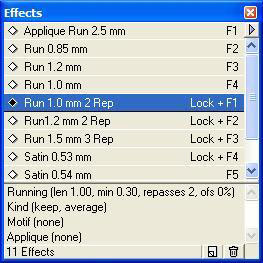
Use the Effects palette to create and apply embroidery effects for new and existing elements. The Effects palette allows you to edit, delete, and duplicate effects just with a mouse click.
Use multiple layers to overlay graphics and text, for greater design freedom and control. The Layers palette lets you create multiple levels of design on separate, overlapping layers in the same document. You can create and modify elements on any layer without affecting design on other layers. You can display, lock, and reorder layers as distinct units.
Use the intuitive Colors palette to pick color attributes for new and existing elements. The Colors palette allows you to create, delete, and modify colors just with a mouse click.
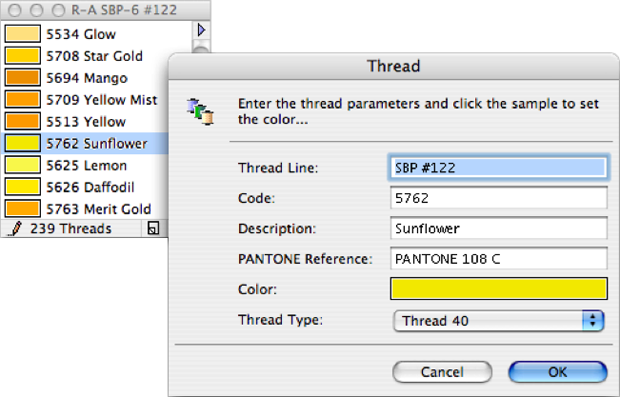
The Threads palette lets you select colors from a range of threads libraries-including the major threads manufacturers' color charts. The Threads palette allows you to create new threads libraries and edit them, so you can choose from pre-set threads color charts or your own threads color charts. The Threads palette lets you find the most suitable thread colors for the colors used in the design.
The Special Functions palette lets you insert special functions in the document.
The Layers, Effects, Special Functions and Colors palettes, along with Tools, Information and Scroller palettes, make it easier to work, letting you do more tasks by simply clicking, rather than choosing commands from menus.
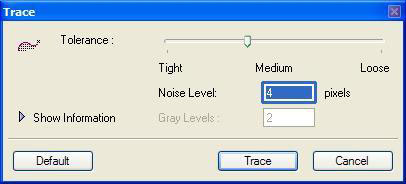
Use it to create automatically paths that traces the outlines of scanned images imported as template inside Punto. The Trace command is designed to convert black-and-white (one-bit-per-pixel) images as well as grayscale or indexed color (multiple-bits-per-pixel, up to 8-bits-per-pixel, i.e., 256 different gray levels or colors) images.
The support of the Adobe Illustrator on the Clipboard (AICB) clipboard type facilitates cutting and pasting complex Bezier-based artwork between applications. Many applications support AICB with copy, paste, or both. These applications include Adobe Illustrator (beginning with Adobe Illustrator 5.0), Adobe Streamline, Adobe TypeAlign, Adobe Photoshop, Adobe Pagemaker, MacroMedia FreeHand, and so on.
The intuitive and terrific Drag and Drop capabilities make it easier and faster to move elements between documents and applications. Just select the elements and drag them to a new location! Drag and Drop allows users to copy data between different applications and windows, much like the Scrap Manager's copy and paste. Drag and Drop is more intuitive and faster operation than copy and paste, and Drag and Drop is easier for novices to learn. You can drag and drop elements between windows of Punto documents; you can drag and drop elements between Punto windows and the Finder windows and desktop; you can drag and drop elements between Punto windows and windows of other applications such as Adobe Illustrator, Adobe Photoshop, MacroMedia FreeHand, Adobe Streamline, and so on; you can drag and drop documents in PICT or Adobe Illustrator's default native and EPS formats from the Finder into Punto windows.
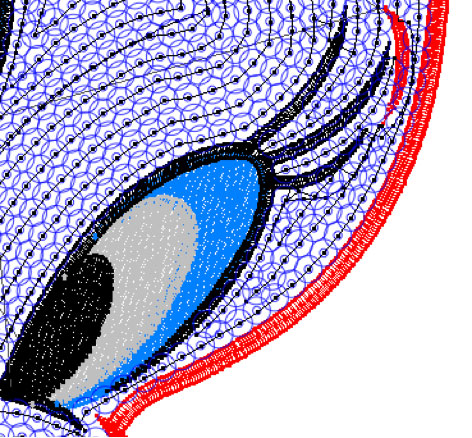
Punto has a photo realistic preview. When in Preview mode the embroidery will be rendered in the document with light and shadow effects. It is also possible to choose a fabric and use it as a background for the embroidery. The Preview Setup command in the View menu lets the user choose a number of options. The light source can be moved and its intensity can be changed to make the embroidery lighter or darker. Any color can be used as a background for the embroidery or a fabric can be selected in the Fabric popup menu.
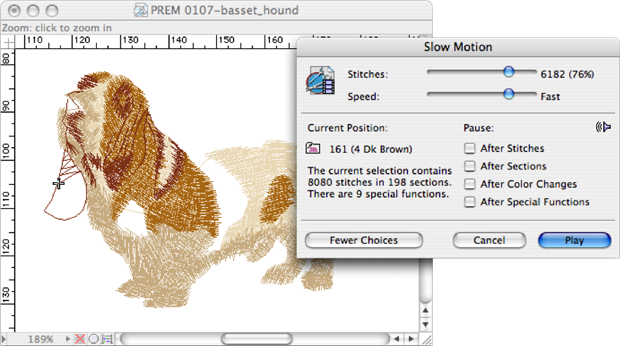
In the Slow Motion feature the Stitches slider shows the current position in the slow motion process, you can use the slider to move back and forth in your document. The Speed slider lets you change the speed from Very Slow to Very Fast. You can pause the slow motion after every stitch, every section, after a color change or when you have a special function.
With Punto and graphics database applications you can automatically catalog, browse, search, retrieve and reuse your designs with attached specifications (stitch count, size, colors, categories,…). In addition, you can create your own categories or criteria to fit your particular business. You can include the photo realistic preview to create electronic sample books or selling catalogs on CD.
With the twin pen tool it is possible to draw twin paths with outlines and direction lines simultaneously. To draw a twin path choose the tool and then move the mouse to the first anchor on the lower path. Now click and drag the mouse (without releasing the mouse button) up to the first anchor on the upper path and release the mouse button. The line between the two anchors is a direction line. To digitize another two anchors click on the second anchor of the lower path and, again, drag the mouse to the second anchor of the upper path. Repeat this operation for all the anchors on the two paths. As you will see all the points on the lower path will be connected each other with a Bezier curve which will be created automatically by Punto.
Mac OS X System Requirements
To run Punto on Mac OS X you need the following hardware and software:
- Mac OS X v.10.6 through v.10.14.
- Intel processor.
- 1024x768 (or greater) screen resolution with a 16-bit card.
- Serial port to connect the embroidery machine.
- USB port to connect the Security Key.
- CD-ROM reader for installation.
Note: Punto performance improves with more RAM, faster processors, and faster and larger hard disks.
Windows System Requirements
To run Punto on Windows you need the following hardware and software:
- Windows XP, Windows Vista, Windows 7, Windows 8 or Windows 10 with the latest Service Packs installed.
- 2 GHz processor or higher.
- 1024x768 screen resolution or higher.
- Serial port to connect the embroidery machine.
- USB port to connect the Security Key.
- CD-ROM reader for installation.
Note: Punto performance improves with more RAM, faster processors, and faster and larger hard disks.
Yes. For security reasons, the security key offers a 30-days grace period beginning upon first use. The Punto software requires you to register within this 30-days grace period. If you do not register the software, you will be prevented from using it after the 30 days. To register the software you have to submit your information on www.softeamweb.com and then complete the online license registration form. This will also ensure you will be registered for free product updates, receive technical support services if needed and be kept abreast of new product developments.
Usually if the light on the security key does not turn on when you connect it, the problem is in the installation of the security key USB driver. The latest version of the USB driver can be found in your licence download area. Before to install it, unplug the security key.
If you start up the program and get a Demonstration version notice (Viewer Mode) come up with it, you will not have the ability to save or export. One possible cause for this is that your grace period is expired. See 1. Is registration mandatory? Another possible cause is that you have problem with the security key USB driver. See 2. Why the light on the security key does not turn on when I connect it to the computer? Another possible cause is that your security key is damaged, in this case please contact us.
You are always able to upgrade your older Punto license to the latest and greatest - you may also decide to move up even further to a higher level than your current one within the Punto family. Our Resellers are available to quote you an upgrade price, based on your existing product level and version number.
Yes. We offer competitive upgrades. Our Resellers can evaluate your current software and recommend a Punto level.
The security key is the hardware enforcement of each product license agreement. Additional licenses of Punto, including the software and the key, can be purchased. Special promotions are designed specifically for this purpose.
Punto is able to import files in Adobe Illustrator’s Encapsulated PostScript (.EPS) and default PostScript-based native (.AI) formats. This means that Punto is not able to import generic EPS files but only EPS files that are conforming to the Adobe Illustrator EPS format. Moreover, starting from Illustrator 9, the Illustrator file format is PDF-based instead of Postscript-based. So, if you want to import an Illustrator file in Punto using the File>Import>Illustrator File command, you have to export it in a previous Illustrator version. E.g., in Adobe Illustrator CS (alias Adobe Illustrator 11) you can do it selecting the File>Export command and choosing "Illustrator Legacy (ai)" or "Illustrator Legacy EPS (eps)" in the Format pop-up menu, then select Adobe Illustrator 8 in the version pop-up menu. For the same reason, Adobe Illustrator CS does not copy the Postscript description in the clipboard for default, so you are not able to paste elements in Punto. To change this behavior, you have to open the Illustrator>Preferences>File Handling & Clipboard dialog box and turn on the AICB option. Now you can copy & paste and drag & drop artwork from Illustrator CS to Punto.
Typically this issue is caused by a problem in the Windows Installer Setup engine when it performs file extraction fron .cab files that are located on a CD-ROM. To work around this issue, use any of the following methods:
- Download from our web site Punto and attempt the software installation (your CD could be damaged).
- Upgrade the Windows Installer Setup engine and try again. You can find the upgrade at the following URL: http://www.microsoft.com/downloads/details.aspx?FamilyID=cebbacd8-c094-4255-b702-de3bb768148f&DisplayLang=en
- Copy the contents of the Setup CD to a folder on the hard disk, restart the computer in Safe mode, and attempt the software installation.
Barudan embroidery machines with CF cards read the FDR HD format, i.e., a FAT volume with desgins in .U?? format. The Barudan .U?? stitch file format (i.e., the Barudan FDR HD disk format) is supported by Punto 6.0.2 or later, i.e., Punto 6.0.2 (or later) is able to export and import this stitch file format. Previous versions of Punto support Barudan FDR and FMC disk formats not based on the DOS format.
There are a few rules to follow:
- Patterns are stored in subfolders on the CF card
- There is only 1 level of subfolders.
- The directory root can hold up to 50 folders.
- Folder names can only have 8 characters, no spaces, and must have an ".FDR" extension (files & folders with >8 characters will appear like DOS-File1~1.U01).
- The file names can have up to 8 characters, no spaces, and must have a ".U01", ".U02," extension (just like on the floppy disk).
For example:
\root\folder1.fdr
\folder2.fdr
\folder3
\folder4.fdr\folder\files
The option to format a floppy disk to the capacity of 720 kilobytes (KB) is missing in the standard Format 3" 1/2 Floppy dialog box (720 KB floppies can still be read and write by Windows XP). However, it is still possible to format a 720 KB floppy via the DOS command: FORMAT /T:80 /N:9 A:
Many new computer floppy disk drives (this is also true for the EDD) are not able to format, read and write the older non-DOS based embroidery machine floppies. This is not a limitation of Punto but a natural evolution in the computer hardware technology. Protect your old hardware or convince your customer to update their embroidery machine to accept DOS format disks, CF cards or direct connection.